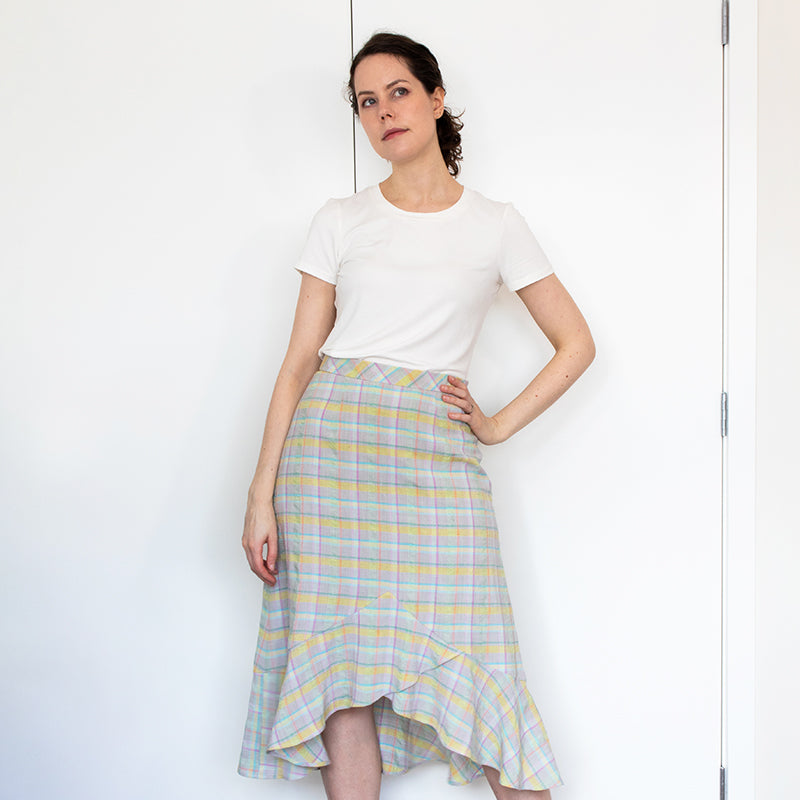
Hello! Jo here with my new Rosalie skirt! It’s such a fun, twirly skirt that brought me out of my comfort zone, both in terms of style and sewing. This year is all about experimenting with different vibes and having freedom with my style. And of course, I’m always up for a sewing challenge! Pattern matching this plaid did make my head spin a little (more on that later!), but I’m so happy with this make!

Before I go into my experience sewing up this skirt and what I learned in the process, I should probably give you the details on the Rosalie Skirt! I designed this one in collaboration with Peppermint Magazine late last year, so it’s available as a pay-what-you-can download (check it out HERE!)


I admit, this style and length is actually quite out of my personal style comfort zone! I’ve always avoided midi-length skirts as I felt they didn’t suit me and my figure, but as I’ve grown, I just feel more and more like discarding all the persnickety little rules about “what not to wear” (I’m sure many of you remember that show - there’s a lot to unpack there!) I’m embracing being more free and letting go of silly rules.
I always have so much to say about my makes and for this one, I can say the plaid kept me humble. I’m so happy with the end result, but also for the ways sewing up this skirt challenged my dressmaking and taught me some new skills. I’m not usually one to sew something up right out the envelope - even for my own patterns! There’s always an opportunity for some personalisation. In this case, I tailored the Rosalie skirt to suit my personal preferences and I made some changes to suit my fabric.

My main change to the pattern was to swap out the elastic back for a fitted waistband and darts at the bum. I love a more tailored feel and the invisible zip at the back is perfect for me. I also omitted the in-seam pockets. I love pockets but the silhouette is quite slim without the elastic, so I didn’t want the bulk. Plus the fabric is slightly sheer and I didn’t want a partially visible pocket stealing any of the skirt’s swishy drama!

Speaking of the fabric’s opacity, I also added a lining. Instead of sewing the darts in the lining, I leave them as pleats. This reduces the strain on the lining and is faster and easier! The fabric is a Japanese deadstock cotton/linen/viscose blend called Sherbert from We Are The Fabric Store. It’s such a cute match for my cream viscose Iris tee. The colours are so fun and I love the plaid, even if it was a challenge to match!

Plaid! I mentioned that the plaid kept me humble. It was one of my more stressful cutting sessions - especially playing tetris with the bolt end cut of narrow fabric I had! There was definitely some overthinking and some head spinning, but I’m glad I made some choices ahead of time about which stripes to match.
The shapes of the Rosalie skirt meant that there were curves and angles that were going to be tricky. Additionally, the fabric’s plaid is uneven both lengthwise and crosswise. So because the stripes going horizontally on the crossgrain are not evenly spaced (so can't be flipped upside down and look the same), the fabric has to be treated with a directional layout. The vertical lines on the straight grain of the plaid also are also uneven. So matching options were limited. Here’s what I chose to prioritise and how it came together!

I cut the waistband on the bias. It makes an intentional, decisive mismatch to the grain of the skirt, rather than cutting it on-grain and knowing it can only really match at the centre (due to the darts and flared waistline of the skirt). I cut the interfacing on the straight grain and fused it to the bias waistband, so it won’t stretch out of shape.
I decided the horizontal stripes were more important to match than the verticals. The big blocks of yellow are the most eye-catching feature and I’m pleased with all my horizontals!
You may notice the plaid at my centre back zip is only matched on the horizontal stripes. I am proud they match pretty well. (And yes, unpicking was involved!) I didn’t have enough fabric to match the vertical pattern of stripes, so there are two orange stripes in a row at my centre back. I had no leeway because I bought the end of the roll of fabric so I had to play mad tetris to get it all to fit. It was a stressful cutting experience, not going to lie (I had 1.9m and the fabric was only 104cm wide)

Next time, I could cut the back on the fold to avoid a seam (for this make I didn’t have enough fabric to do so anyway). Then I could put the zip in the side seam. I do prefer zips at centre back though, rather than putting them into seams with shaping. And one more thing - with the back cut on the fold, I still wouldn’t be able to match the vertical stripes at the side seams at both sides. So there are pros and cons to that idea really!

Since the plaid isn’t even, the relationship between the centre back and side seams is a contentious area: the plaid goes in one direction from left to right, so your matching options are limited.
It occurred to me later that because this fabric’s wrong side and right side look the same, I could have cut one back piece on the wrong side of the fabric and one on the right side. That way, the vertical stripe patterns would mirror each other across centre back. You could even plan for the vertical stripes on the side seams to match to the front, by cutting the front first, and using that as a guideline for each back. But it would be a lottery where the stripes at centre back hit, so it’s possible two prominent lines would end up right next to each other and that would probably annoy me more than unmatched side seams…(see this image I made where I mirrored my skirt at the centre back). It’s food for thought for next time, anyway!

One of my side seams chevrons on the vertical stripes and the other doesn’t, due to the way the backs are cut. I’m fine about it though. Like I said, I had limitations!

At the centre back of the waistband, I picked one stripe (the purple one) and made them chevron together. I believe this fabric cannot chevron perfectly on the bias though, because it’s an “uneven plaid” (the plaid is not symmetrically mirrored). So while the purple stripes match, the other stripes don’t. That’s why I picked the purple to chevron, as it’s a visually dominant stripe.
For the skirt’s centre front, I chose to place it in between the orange and purple vertical lines. I just didn’t like the idea of a prominent thin stripe hitting the point of the flounce and being off by a few millimetres. And yes, that might be overthinking it (hint: that’s the theme here).
I matched the flounce to the skirt around the centre area but I actually wonder if it would be better to just do it like the waistband; embrace an intentional mismatch and cut the flounce pieces on the bias. It would probably change the way the flounce draped (it would probably stretch out at the side seams and need trimming), but I think it might be the best and easiest treatment!
I didn’t bother matching the side seams of the flounce. The flounce doesn’t match anything at centre back either.

To be honest, while planning this make, the longer I thought about plaid, the more my brain overheated! I’m sure there’s lots more to learn.


The good news is that I’m happy with my make, despite all the little things. Even better news is that I could feel my sewing brain getting bigger because I challenged myself. I think I have a way healthier approach to sewing these days. I encourage you to go easy on yourself. We never stop learning! Do you have any plaid tips or notes? I would love to hear them.

It wouldn’t be a Forget-me-not celebration without showcasing the amazing makers who brought our designs to life. Today, we’ll share more about who really made it all possible - you!

Fancy a stroll down memory lane? Forget-me-not is saying farewell (at least, for now), but before we go, it’s time to celebrate where we’ve been!
Forget-me-not Patterns launched July 3, 2019 with the Clementine Knit Dress pattern. It was clear from the beginning that the sewing community was eager for distinctly detailed patterns with lots of options for styling and fit. We set out to design wearable wardrobe staples with extra special details to create pieces that were both elevated and easy to wear.

Dear Sewists,
With a grateful, yet heavy heart, Forget-me-not Patterns is saying farewell. At least for now. Design and patternmaking mean absolutely everything to me, and this decision hasn’t been an easy one.


